Sunday, April 29, 2012

Arbor Day Foundation

Arbor Day

I have been a member of the Arbor Day Foundation since 2004.  I became a member when I decided to give trees as wedding favors.  I’m not sure if anyone was able to grow their tree (ours didn’t grow), but I continue to renew my membership every year. 

Each year they give me the opportunity to receive 10 free trees.  I did take them a few years ago, but none of them survived.  This year I decided to give it another go.  Earlier this week I received a Colorado Blue Spruce, White Pine, White Flowering Dogwood, Pin Oak, Sugar Maple, Silver Maple, Red Maple, Northern Red Oak, River Birch and Eastern Redbud. 

IMG01196-20120429-0928

They arrived while I was out of town, so Jamie stored them in the refrigerator for about 3 days.  The trees have a small painted area above the roots to distinguish them but I like to make tags so I don’t forget which is which.  I soaked the roots in lukewarm water for about 2-3 hours. 

IMG01186-20120428-1530

I found these cute colorful plastic pots at Walmart for $2 each.  I filled them with topsoil and then added a tree to each one.  I added a layer of mulch to help keep them from drying out.

IMG01188-20120428-1552

IMG01189-20120428-1559

I gave the White Pine, Blue Spruce and Flowering Dogwood to a friend and I have one to give to my BIL to celebrate his new home.  Let me know if you would like to plant one in your yard.  They can stay in these pots for 1-2 years before finding their permanent home in the ground.

Sunday, April 8, 2012

Spring Cleaning

These past 6 weeks I’ve been Spring cleaning so we can get the condo listed again next week.  Here’s a list of things we’ve been doing:

De-cluttering

  • Bedroom closets
  • Hallway closet
  • Under sinks
  • Kitchen cabinets
  • Storage crawl space
  • Garage 

A lot of things were thrown away or donated to Goodwill.  I sent some of Jake’s clothes and toys to work for some co-workers.  The rest went to a storage unit we are renting.  We also removed some furniture from the basement, bedrooms, and living room.

Painting

  • One bedroom was still the same since we moved in, so that is now a nice cream color called Sand Trap (Ace)
  • Stained the deck which only needed it on all horizontal surfaces and took about 2 hours

We still need to touch up the trim outside and do the hallway down to the basement.

Cleaning

  • Jake’s bedroom wall with crayon marks was cleaned with the Magic Eraser, worked great!  Luckily the crayon was on the wall behind the door.
  • The vertical blinds for the patio door were so dirty and grimy.  They are cloth, so I figured before throwing in the towel I would see what happened if they went in the washing machine.  They look brand new!  Should have done that years ago.
  • All windows inside and out were cleaned with Windex Foaming Glass and Multi-Surface Cleaner and it worked amazingly well! 
  • Wiped down all ceiling fans
  • Basement carpet was cleaned with Resolve High Traffic Powder.  This worked okay, a steam cleaner would probably make it even better.
  • The shower stall in the basement was all Jamie.  He removed all the doors, re-calked the inside, and did his best to clean all the doors.  Not as good as we would like, but about as good as it will get.
  • Cleaned up two flower beds and planted some wildflower seeds.  I know it’s early, but I can always try again later.

Fixing

  • Jamie bought and installed a new entry door and a new door to the garage.  They are so much better than the old ones.
  • I put in a new screen for the front door and Jamie helped me with the patio screen.  Advice: buy fiberglass screen, not aluminum screen.
  • I re-glued some wallpaper that Jake liked to pull on.
  • I replaced the ugly brick retainers under the deck with some better bricks.
  • Grass seed was put down yesterday to try and patch some bad spots in the lawn. I hope this works.

We still need to fix/replace a corner piece of siding and also a downspout.  

We have done so much and I really hope that we are able to sell the condo.  The hardest part is just keeping it clean all the time which is hard to do with a 3 year old.

Tuesday, March 6, 2012

Cake decorating tips & tricks

If you are interested in learning more on how to decorate cakes like the one’s I’ve blogged about, this post is filled with my tips and tricks. 

My first tip is to take a beginner cake decorating class.  I have only taken the beginner class at Michael’s and I keep meaning to take the second one, but I just haven’t gotten around to it. The beginner class will help to familiarize yourself with how to use the frosting tips and give you some good frosting techniques. 

My next tip is to invest in the Wilton Master Tip Set.  I did have to buy the grass tip (233) separately, but below are the tips that are included in the set.  I haven’t used all of them yet and I like to play around with them to see if I can get the effect I’m looking for.

Master Tip Set_thumb[1]

To get great coloring with your frosting be sure to use gel food coloring.  But to really get a good red or black, it’s best to buy it at a cake supply store. 

Invest in good cake pans.  For Christmas I received a 6x2”, 8x2” & 10x2” round aluminum cake pans and I also just bought a 9x13x3” aluminum cake pan all by Fat Daddio.

For the most recent cake I baked I used Bake Even Strips.  These strips are soaked in cold water and then wrapped around the base of the cake pans.  Without them the center ends up baking taller than the sides and you have to cut the top off to make it level.

cake tips2_thumb[1]

When baking a larger cake I also put a flower nail in the bottom of the pan to help distribute heat into the middle of the cake. 

004

I line the bottom of the cake pan with parchment paper.  If you have a more decorative bundt pan or a molded pan be sure to spray with baking spray (has flour in it so you don’t have to grease and flour separately).

I don’t remember what this tool is called, but it cuts the cakes in half for you without having to eyeball it. 

cake tips_thumb[1]

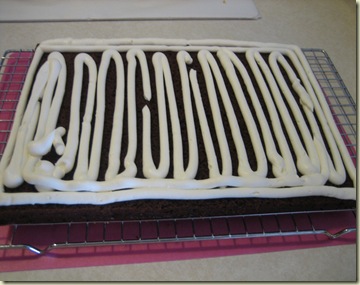
To add equal amounts of frosting between layers I use a piping bag with tip 12.  After piping the frosting like below, I spread it out with a frosting spatula.
008

I also do a crumb coat before doing any colored frosting.  To do this you coat the cake with a thin layer of frosting.  You will get lots of crumbs mixed into the frosting but it’s supposed to do that.  After the cake is coated you freeze it for 30 minutes or so.  If it doesn’t fit in your freezer you can put it in the refrigerator for at least an hour or if it’s Winter in Wisconsin you can just put it outside for a while (I’ve done this multiple times).  Now you can frost with your colored frosting without worrying about getting crumbs in your frosting.

011

The most recent frosting recipe that I’m in love with is Rick’s Special Buttercream Frosting I found at allrecipes.com.  I took the advice in the multiple reviews to use 1 cup butter & 1 cup shortening instead of the listed 2 cups shortening.

I hope these tips and tricks help or make you more confident that you too can create amazing cakes!

Sunday, March 4, 2012

From pictures to cakes

I really enjoy decorating cakes, however, I often don’t have the creativity to think of an idea on my own.  So most of my creations come from a picture I found online.  Here are two cakes I decorated based on pictures.

My son’s 3rd birthday was a couple months ago, and I wanted to make him a Thomas cake.  Here’s the picture I found online:

Thomas cake picture 

I baked two 9” rounds and kept one as is and cut the other one in half.  I flipped one half onto the other half and put those halves on one side of the other round that I didn’t cut.

Thomas cake finished

The boulders I used were chocolate covered peanuts.  The train is from a Thomas book that came with tiny Thomas and Friends trains. There wasn’t a picture of the back of the cake, so I used my imagination there.  I used tip 233 for the grass and my smallest leaf tip 65 for the leaves on the trees.  

My niece wanted a fairy cake for her birthday.  Here’s the picture I found online:

online fairy cake picture

This one looks a little more daunting, but in reality it was also pretty simple.  This was two 9x13” cakes.  Leave one as is for the bottom layer and cut the other one in half.  Place one half on one side of the bottom layer and from the remaining half cut it from corner to corner to make a triangle and place it on top of the half.  There should still be one corner left which should be cut into a cupcake size circle and place it on the bottom layer next to the second layer. 

Fairy cake how-to

014

To make the vines I used tip 4 and added purple dots with tip 2, to make the green boarder I used leaf tip 67, the pink flowers were made with tip 21, the small white flowers were with tip 16 and the larger white flowers in the water was with tip 22.

The fairies are from the Disney Tinkerbell Fairy Friends Signature Cake Topper set.  They have stamps on the bottom and come with a stamp pad.

Tuesday, February 28, 2012

Washing the washing machine

A recent pin via Pinterest was a tutorial on how to clean your HE washing machine.  I’ve owned my HE washer for over 8 years and I never thought of cleaning it.  So, after putting Jake to bed last night I washed the washer.  Here’s the general idea:

With the machine empty, run a hot cycle with 2 cups vinegar.  Next run a hot cycle with 2 cups bleach.  And finish with another hot cycle without anything. 

Click here for the original post. 

In the end the washer looks sparkling clean!  Maybe my clean washer will make my whites whiter and my colors brighter!

Monday, February 13, 2012

Valentine’s Treats

For Valentine’s Day I decided to make two treats that I found via Pinterest.  First up were Chocolate Covered Pretzels, which I’ve actually done before, but this time with a twist.  These are for Jake’s daycare.

005

I used the mini twist pretzels and covered the top half with white chocolate.  Once that solidified I used candy colors to dye the white chocolate pink and purple.  I used a piping bag to make lines and dots.  It was fairly easy to do and looks super cute!

003

004

Next up were Homemade Snicker Bars.  Those that know me best know that I LOVE snicker bars!  And some of you may not realize that Jamie loves them more than me, so I thought I would whip him up a batch.  But a batch is a 9x13” pan, so I am sharing them with my co-workers too.

006

These look daunting and the recipe even seems hard, but I would say this was actually easier than the chocolate covered pretzels.  Go here for the recipe.  I cheated though and used the freezer to cool each layer, that way I could start the next layer immediately.  I also took her advice and bought an aluminum pan which made it so easy to pop out and cut.

001

002

Happy Valentine’s Day!

Monday, February 6, 2012

Fun foods

My brother invited us to a Super Bowl party this past Sunday.  And the only reason to watch the Super Bowl when your favorite team isn’t playing is for the commercials and for the food.  Being back on Weight Watchers meant I would have to make sure there would be some healthy food too. 

The first thing I thought to make were fruit kabobs.  I love fruit and that I can eat lots of it while on WW.  I wanted to make them look like the rainbow, so I picked fruit from every color.

001

I bought strawberries, clementines, pineapple, green grapes, blueberries and red grapes which were more on the purple side.  Some pieces of fruit were larger than others so I just arranged as needed.  The pineapple was hard to keep on the skewers, but I made it work.

002

I made 30 of these and they were gone fast!  The kids really liked them although the parents were a little nervous of the pointy sword-like skewers that were left, but at least they ate something healthy!

003


I also wanted to make a dessert, so I made football Rice Krispie treats.  I used Cocoa Krispies to make them more realistic and also used melted white chocolate to make the laces.  While they aren’t the healthiest dessert, they were fun and tasty!

004

I hope you enjoyed the food and commercials too!